Basic Email Setup
Step-by-Step Instructions on Setting Up Email Accounts
Step 1
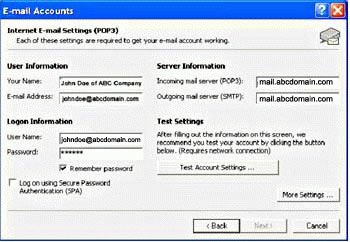
Open Email Program and click on 'Tools' in the menu bar. Then click on 'Email Accounts'. When a dialog window comes up, select 'Add a new e-mail account', then select 'POP3' as your server type. After clicking 'Next' you will see a dialog box similar to the picture to the right, only all the fields will be empty.
User Information
This section is where you fill in the individual user's information that you would like to appear as the "Sender's" information in outgoing emails. Fill in 'Your Name' with the name that you would like to appear as the "Sender's Name". Fill in the 'E-mail Address'' that you want to appear as the "Sender's Email Address".
Therefore you can use:
- Your Name
- youremail@yourcompany.com
Logon Information
Here is where you will enter the security information required to access each individual POP3 Email box account. Even though you may have multiple users accessing one individual POP account, each user may use different User Information, but the Login Information will always be the same when accessing the same POP account.
- Logon User Name: youremail@yourcompany.com
- Password: ********
Server Information
This is the information that tells the Email Program where to find your email server. Copy the information exactly as in the picture above.
Step 2
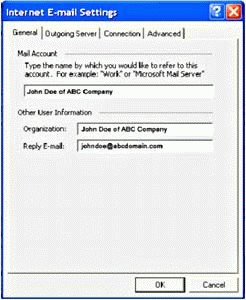
There are a couple additional steps that must be taken in order to personalize this email account for the user. When you click on "More Settings" another dialog box with four tabs will appear as seen to the right:
Please make sure that you fill out the information as seen into your 'General' settings. Again, these are personal preferences and only affect how your name and email address appear when sending email. Therefore you can input most anything you like in this section.
Once complete go to the next step by clicking the 'Outgoing Server' tab.
Step 3
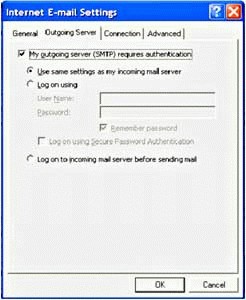
When you click on the 'Outgoing Server' tab, you will see the following screen to the right. For security, you must make sure that your Email Program is setup so that "My outgoing server (SMTP) requires authentication" is checked and that "Use same settings as my incoming mail server" is selected.
To move on click on the 'Advanced' tab.
Step 4
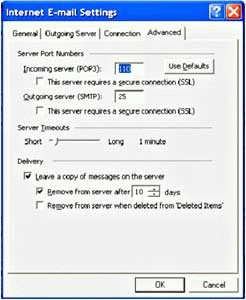
Upon clicking the 'Advanced' tab, you will see the screen to the right.
In order to retrieve your email from multiple computer devices (iPhone/iPod, office computer, home computer, Blackberry, WebMail, etc) it is important to make sure that you click 'Leave a copy of messages on the server'.
Equally as important to avoid your email box from filling up make sure that you have 'Remove from server after __ days' checked and a number assigned.
Usually we recommend that you tell your Email Program to remove messages from the server after 5-10 days so that the server doesn't fill up with messages as the server only has so much room for messages for your account. When your Email Program pulls messages into your computer, you can keep them as long as you like. This is just a setting telling the email server to only keep messages for a certain time period.
Step 5
Click 'OK' and you will be returned to the main screen seen in Step 1. From here you can click 'Next' and then 'Finish' and your Email Program should be ready to go and download messages from the email server to your Email Program.
Did this help you?
If you require additional assistance, please return to the Knowledge Base and search additional topics. If you still cannot find the help you require, please contact us or submit an online support ticket.
Request A FREE Consult Now