iPhone IMAP Setup Guide
Step-by-Step Instructions on Setting Up Email Accounts
Step 1
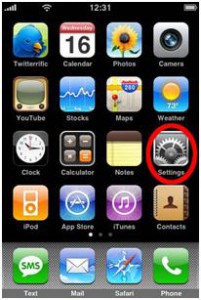
Turn on your iPhone and from the home screen click on Settings
Step 2
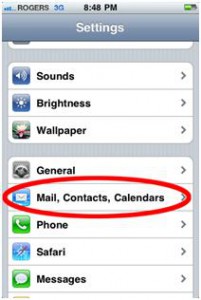
From the Settings menu select Mail,Contacts, Calendars
Step 3
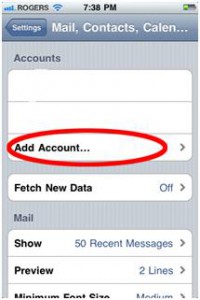
From the Accounts screen select Add Account
Step 4
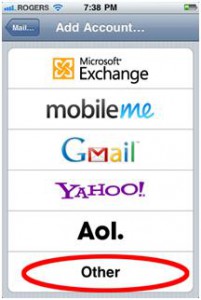
On the Add Account page select Other
Step 5
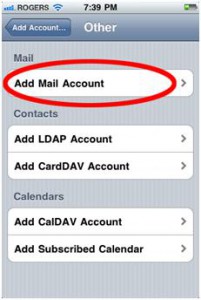
Select Add Mail Account
Step 6
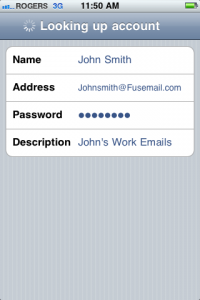
On the New Account page fill in the corresponding information. The description can be anything you'd like and fill in the name as you would like it to appear for outgoing messages.
Step 7
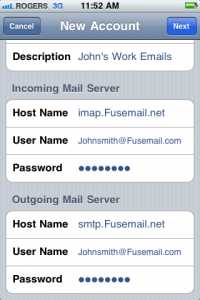
Fill in the New Account information using Imap.Fusemail.net as the incoming mail server and Smtp.Fusemail.net as the outgoing server.
To double check your username and password you can log onto Webmail via webmail.ad-sol.com. In most cases the username will be your full email address. Once you're done click Next.
Step 8
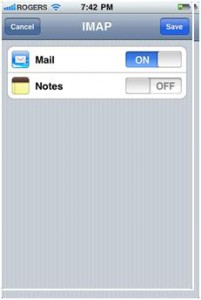
Making sure Mail is switched to On select the Save option.
Step 9
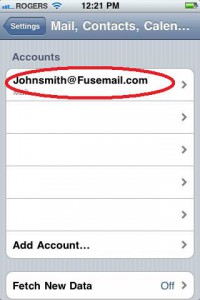

Once the above steps are completed select the Mail icon from the iPhone home screen and let your new mailbox sync with your iPhone. Once the sync is complete from the home screen select; Settings >Mail, Contacts, Calendars > 1.Select your mailbox from the list > 2.Click on Account Info
Step 10
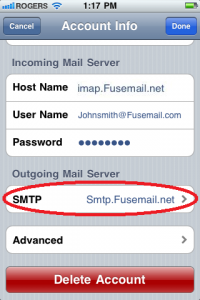

Select the SMTP server > Select the primary SMTP server
Step 11
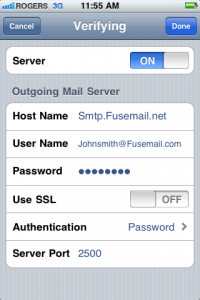
Ensure that all of your settings match the screenshot depicted below. SSL should be off, Authentication should be set to Password and the Server Port is 2500. Once done select Done.
Step 12
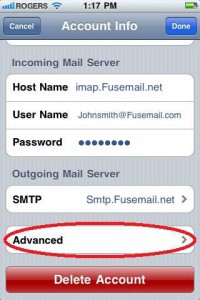
Back at the Account Info screen select Advanced
Step 13
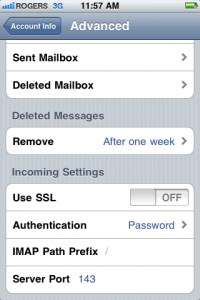
One at a time select the Drafts mailbox, Sent mailbox and Deleted items mailbox and select the corresponding folders under “On the server.” This will map the iPhone so that it puts the corresponding emails into the right folder on your iPhone and likewise on the server. Set SSL to off, authentication to password and the server port to 143 and select Done. From the Account Settings screen click Done again. Your account is fully setup to send and receive mail.
Step 1

Turn on your iPhone and from the home screen click on Settings
Step 2

From the Settings menu select Mail,Contacts, Calendars
Step 3

From the Accounts screen select Add Account
Step 4

On the Add Account page select Other
Step 5

Select Add Mail Account
Step 6

On the New Account page fill in the corresponding information. The description can be anything you'd like and fill in the name as you would like it to appear for outgoing messages.
Step 7

Fill in the New Account information using Imap.Fusemail.net as the incoming mail server and Smtp.Fusemail.net as the outgoing server.
To double check your username and password you can log onto Webmail via webmail.ad-sol.com. In most cases the username will be your full email address. Once you're done click Next.
Step 8

Making sure Mail is switched to On select the Save option.
Step 9


Once the above steps are completed select the Mail icon from the iPhone home screen and let your new mailbox sync with your iPhone. Once the sync is complete from the home screen select; Settings >Mail, Contacts, Calendars > 1.Select your mailbox from the list > 2.Click on Account Info
Step 10


Select the SMTP server > Select the primary SMTP server
Step 11

Ensure that all of your settings match the screenshot depicted below. SSL should be off, Authentication should be set to Password and the Server Port is 2500. Once done select Done.
Step 12

Back at the Account Info screen select Advanced
Step 13

One at a time select the Drafts mailbox, Sent mailbox and Deleted items mailbox and select the corresponding folders under “On the server.” This will map the iPhone so that it puts the corresponding emails into the right folder on your iPhone and likewise on the server. Set SSL to off, authentication to password and the server port to 143 and select Done. From the Account Settings screen click Done again. Your account is fully setup to send and receive mail.
Did this help you?
If you require additional assistance, please return to the Knowledge Base and search additional topics. If you still cannot find the help you require, please contact us or submit an online support ticket.
Request A FREE Consult Now


